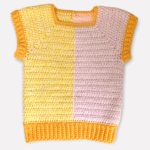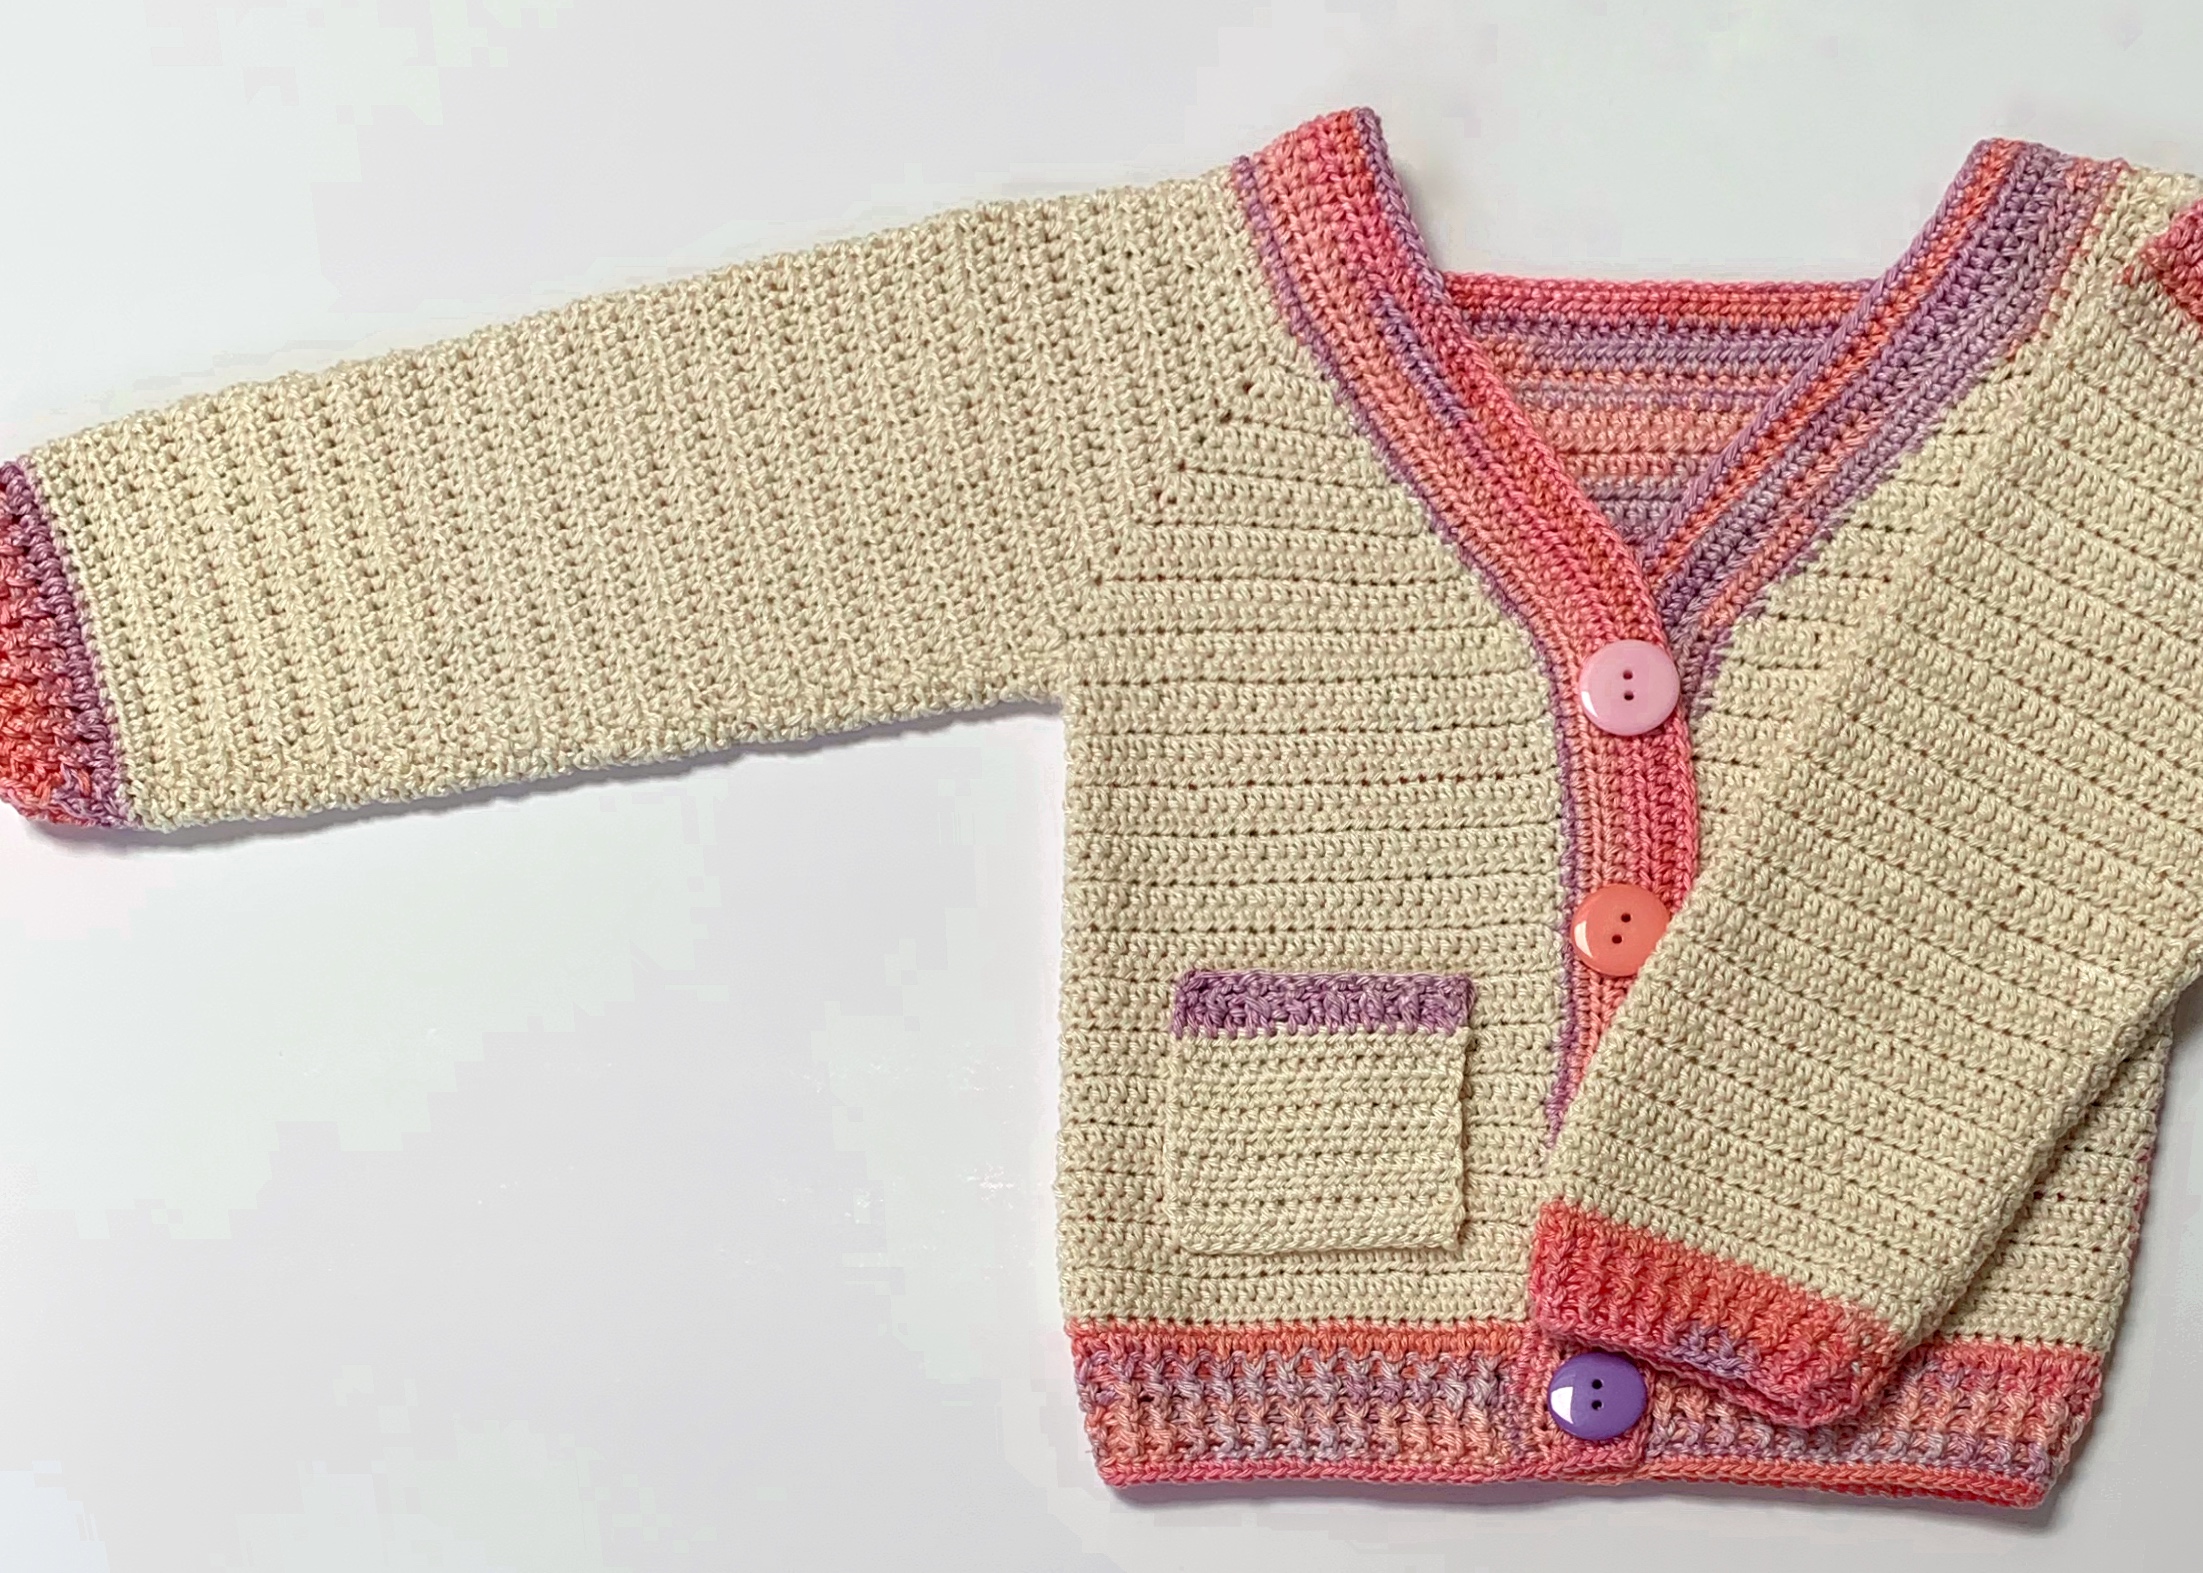
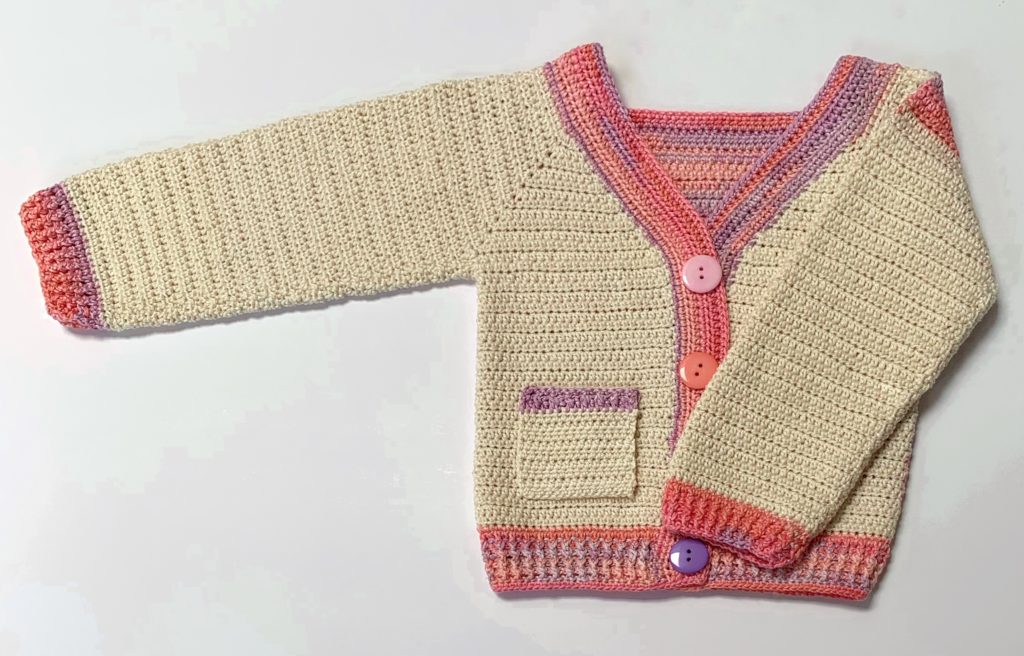
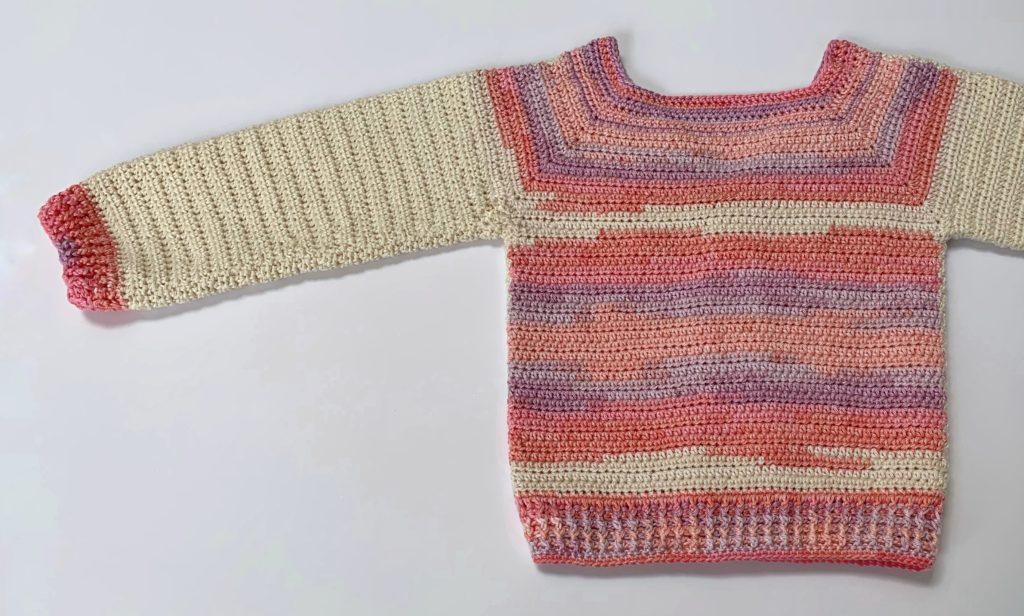
I’m finishing this up now for a 24-month-year-old in a gorgeous mercerised cotton yarn from Ice Yarns. The back and edging are worked in a self-striping yarn, Camilla Cotton Magic,* and the front and arms in Camilla Cotton Cream. I just have to finish weaving in a few ends, attach the pockets and give it a gentle wash and a final check.
A real fun factor in this garment is the different coloured front and back sections, a feature not often seen in children’s garments! I really love how it worked out. I loved creating this overall effect without the need for seaming different sections together. I kept notes as I was going along and have made a start at posting the main sections so far. I’ll post the rest as soon as soon as I can.
*I used this very same yarn for one of the Sally chevron matinee jackets I made last summer.
Notes & Instructions for Approx 24 Months
Finished Measurements
| Neck width at back | 12.5 cms | 5″ |
| Chest (laid flat) | 26 cms | 10″ |
| Armhole depth | 12 cms | 5″ |
| Sleeve length from underarm | 23.5 cms | 9.5″ |
| Garment length from top shoulder | 32 cms | 12.5″ |
| Garment length from back neck | 30 cms | 12″ |
| All measurements are approximate |
Materials Used
- Crochet Hook: 3mm
- 4-ply yarn in MC and CC (Weight 2 / Sport / Baby)
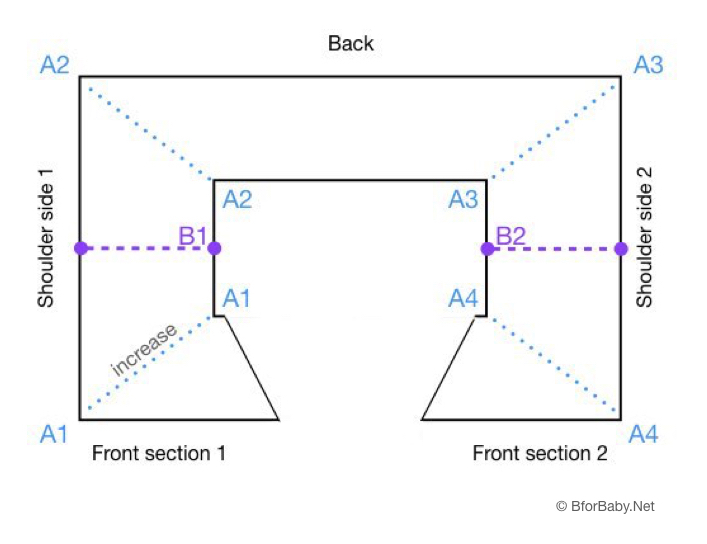
- Stitch Markers (I used nine: four for each of the corners (A1-A4 in the diagram below), two for the shoulder midpoints (B1 & B2), one each for the first and last stitches of every row, and one to mark the WS of the garment.)
- Tapestry needle for weaving in ends
- Scissors
- Tape measure or ruler.
Skill Level
The pattern is designed with the intermediate crocheter in mind. It’s not complicated, but requires knowledge of increases and decreases, creating ribbing with front post and and back post double crochet, regular colour changes using three separate yarns at the same time.
Yardage
To be confirmed shortly. Very approximately:
| Yarn | Weight | Metres | Yards |
| MC | 200 g | 500 m | 550 yds |
| CC | 100 g | 260 m | 284 yds |
Abbreviations
These notes use US terminology
| ch(s) | chain(s) |
| sc | single crochet |
| dc | double crochet |
| dc[#]tog | double crochet [#] stitches together |
| hdc | half double crochet |
| hdc[#]tog | half double crochet [#] stitches together |
| inc | increase |
| st(s) | stitch(es) |
| sl st | slip stitch |
| sk | skip |
| BPdc | back post double crochet |
| FPdc | front post double crochet |
| CC | contrast colour yarn |
| MC | main colour yarn |
| WS | wrong side (i.e. the inside of the garment) |
| SM(s) | stitch marker(s) |
| rem | remaining |
| rep | repeat |
| rnd(s) | round(s) |
Gauge
Taken from finished garment: 22.5 sts x 15 rows of hdc = 10 cms x 10 cms (4″ x 4″).
Pattern Notes
- The cardigan is worked in one piece from the top down using the square yoke method adapted to create a V-neck, with ribbing added at the bottom. The sleeves are then added on either side, and sleeve ribbing is added. Finally, the button band, neck edging and button hole band are added to complete the garment.
- This pattern uses US terminology.
- Ch 1 at the beginning of a row or round does not count as a stitch.
- MC yarn should be divided into two equal amounts. Alternatively two separate skeins can be used.
- At times we will be using three separate balls of yarn at once. It’s easier to pull the yarn from the centre to avoid the balls rolling about and getting tangled.
Instructions
Please refer to the diagram below:
Getting Started
Foundation Row: Using CC yarn, create base chain of 78. At the final stitch pull through with MC. (Total sts 78)
You can now either (a) fasten off and cut CC yarn leaving tail long enough for weaving in or (b) crochet over CC and carry it back to the first mid-shoulder SM at stitch #13.
Row 1: Now using MC, ch 1 and turn. Work 1 sc in every st across, counting as you go and placing Series A SMs in stitches #2, #23, #56, #77 (A1, A2, A3, A4 in diagram above.) These will form the neck corners. (Total sts 78)
Now place SMs Series B (ideally in a different colour) in stitches #13 and #67 (B1, B2 in the diagram above) to represent the shoulder midpoints where you’ll change colours. Stitches #13 and #67 are the first in your new colour. (Placing the SMs this way means you can complete your last st of the current colour without moving the SM.)
Row 2: From now on we will create our V-neck by increasing by one st at the beginning and end of every row.
Ch1 and turn. Inc immediately by working 2 hdc in the st at the base of your ch1. In the next st (A1) work 3hdc, then immediately replace the SM into the middle hdc just worked. (First corner created.) Work 1 hdc in every st long until SM B1 at st #13. Finish the previous st by pulling through with CC, work st #13 in CC, and immediately move the SM to the previous st (this will be the first st in new colour in the return row). Working now in CC, 1 hdc in every st along to SM A2 at st #23 where you work 3 hdc and immediately move the SM into the middle stitch just worked. (Second corner created.) Working now along the back section in CC, continue working 1 hdc into every st along to corner SM A3 at st #56. Work 3 hdc into this st and immediately replace SM to the middle of the three stitches as before. (Third corner created.) Continue to SM B2 at #67, pulling through with MC on the previous st to change colours, and work 1 hdc in each st to SM A4 at #77. Work 3 hdc into this st and again replace SM as before. (Fourth corner created.) Inc in final st #78.
💡 As soon as possible, ideally by Row 2, establish which is going to be the WS of your garment, so that when completing colour changes you can drop your yarn to the inside of the garment and keep your work consistent throughout. You may find it helpful to mark this side with a SM.
Rows 3-5: Continue in the same manner as Row 2, increasing by 1 hdc in first and last stitch, changing colours at the shoulder midpoints (SMs Series B), and working 3 hdc into each of the corners (SMs Series A).
Row 6: In this round, we are going to add an extra increase to the shoulder sections.
Continue as previously except that in this row we’re going to add an extra increase on the shoulder sections only, i.e. work 4 hdc into each corner st. When replacing SMs, take care to place them correctly – i.e. in 2nd of the four for SMs A1 and A4; in 3rd of the four for SMs A2 and A3.
Row 7: As Row 2 – i.e inc equally in each corner
Row 8: As Row 6 – i.e inc extra on shoulders
Row 9: As Row 2 – i.e inc equally in each corner
Row 10: As Row 6 – i.e inc extra on shoulders
Row 11: As Row 2 – i.e inc equally in each corner
At the end of Row 11, check the measurements of your garment to ensure armhole depth and chest width are now adequate. Assuming measurements are good, you may fasten off CC at the shoulders and proceed to Divide for Sleeves & Body.
💡 Note: If necessary, you can add a little extra depth by working an extra row or two, and you can add chest width by adding extra chains under the arms in the next step. If adding extra chains, make sure it’s an even number.
Divide for Sleeves & Body
In this next round and with reference to the diagram above, we will join A1 to A2, and join A3 to A4. We will return later to the shoulder sections, which will extend to become the sleeves, and meanwhile continue to work on the body of the garment.
💡 Note: in the next row we are also going to change colours under the arms, which involves creating a second chain in CC. This is quite fiddly. As a workaround, you could do both chains in the same colour, attach the new yarn at the next hdc, and then carry the old yarn back to the midpoint on the return row. This would work better if the two yarns are not dissimilar in colour.
Row 12: Ch 1 and turn. Inc in the first st as usual. Continue working 1 hdc into the top of each hdc until A1 (corner 1). Work 1 hdc, ch1, then change yarn to CC and work a second chain in CC. Now sk all sts until A2 (corner 2). Still with CC, work 1 hdc into corner 2, work 1 hdc in every st along the back of the garment to A3 (corner 3), and then repeat the joining method to join corners 3 and 4, switching to MC at the underarm midpoint. Continue with 1 hdc in MC every st rem to the end of the row. Inc in final st as usual.
💡 I find it helpful to keep using my SMs B1 and B2 down the side, to make sure I don’t inadvertently change colours a stitch too late or early (especially with a variegated yarn).
Row 13: Inc in the first st as usual. Continue working 1 hdc into the top of each hdc around, changing colours at midpoints B1 and B2, working into the sts and the chs in the underarm areas. Inc in the final st as usual.
💡 As you pull through on your first ch under the arms with your new yarn and complete the second hdc into the second ch, you will be able to tighten up any looseness that occurred after dropping MC in the previous row.
Row 14: We have now stopped increasing. Our two front sections are each two sts short of the back section.
Crochet even, continuing with the same number of sts until the garment reaches the desired length. Simply remember to change colours at the midpoint under the arms each time.
Next Rows: Rep Row 14, until you reach a total of 38 rows or until garment measures 4 cms less than desired finished length. Fasten off CC and MC, leaving tails long enough to weave in.
💡 Note: for this sample in my chosen cotton yarn I was happy with the way the garment was falling and decided to maintain the stitch count and use the same hook for the ribbing. However, should you wish to pull in the hem a little more, a couple of options are (i) to work a few decreases equally distributed around the final row of hdc, or (ii) to drop down one hook size for the bottom ribbing.
Bottom Hem Ribbing
Row 1: Working now from the outside of the garment, attach CC and work 1 sc in every hdc along to the end of the row.
Row 2: Ch 1 and turn. Work 1 dc into the st at the base of your ch1, and 1 dc in each next st along to the end of the row.
Row 3: Ch 1 and turn. Work 1 dc into the st at the base of your ch1, FPdc around the next dc, BPdc around next dc, FPdc around next dc, repeating this sequence to last but one st, continuing to alternate FPdc and BPdc to create ribbing. The final st should be a regular dc to mirror the first dc.
Row 4: Rep Row 3 a further three times or until garment reaches desired length. Fasten off and cut yarn, leaving a tail long enough for weaving in.
💡 Note: The neck edging, and the button and buttonhole bands, are worked all together in CC with the first row worked from the outside of the garment.
If, after having completed your bottom hem ribbing, you have ended up on the correct side to be able to work up the front edge from the outside, you may wish to go direct to that step next, to avoid cutting and reattaching your CC yarn.
Of course, you may also prefer to complete the arms next in MC, and then finish up by completing all your ribbing and edging in CC at the same time.
Sleeves
First make sure the stitches are pointing in the same direction as if you had just turned your work.
Rnd 1: Attach MC yarn and ch 1. hdc2tog immediately starting in next st. Place SM into top of completed st then hdc2tog once more. Work 1 hdc all the way around to last 2 sts. Hdc2tog in final 2 sts where final st is worked into the st at base of ch1 from the beg of the round; sl st to join.
Rnd 2: One decrease.
Ch 1 and turn. Work first hdc into next st, work 1 hdc into each hdc around to final 2 sts, hdc2tog once, working final st into st at base of the ch1 from the beg of the round, sl st to join.
Record the number of stitches you made after Rounds 1 and 2, so you can replicate this on the other side.
Rnd 3: No decreases.
Ch 1 and turn. Work first hdc into next st, work 1 hdc into each next hdc around to the end of the rnd, working final st into the st at base of ch1 from the beg of the round, sl st to join.
Rnds 4-6: Rep Rnd 3 – i.e. no decreases
Rnd 7: Rep Rnd 2 – i.e. one decrease
Rnds 8-34: Rep previous sequence, i.e. working even for four rounds with 1 dec in every 5th row.
Rnd 35: Work even. At the end of the rnd, stop to count sts. By the end of Rnd 36 we need a total of 44 sts. Calculate the number of decreases you need to work in the next rnd and place the corresponding number of SMs distributing them equally around.
Rnd 36: Continue as previously, whilst working decreases as per SMs. At the end of the round, check you have 44 sts and adjust if necessary.
At this point your sleeve should measure 21.5 cms from underarm, or 3 cms less than your desired finished length. Adjust number of rows here if desired.
Sleeve Ribbing
Rnd 1: Working now from the outside of the garment, attach CC and work 1 sc in every hdc along to the end of the rnd, sl st to join.
Rnd 2: Ch 1 and turn. Work 1 dc into the st at the base of your ch1, and 1 dc in each next st along to the end of the rnd, sl st to join.
Rnd 3: Ch 1 and turn. Work 1 BPdc around the st at the base of your ch1, FPdc around the next dc, BPdc around next dc, FPdc around next dc, repeating this sequence to last st, continuing to alternate FPdc and BPdc to create ribbing, sl st to join.
Rnd 4: Rep Row 3 a further two times for a total of 4 rounds of dc, or until sleeve reaches desired length. Fasten off and cut yarn, leaving a tail long enough for weaving in.
Front & Neck Edging
To be added shortly
Pockets
To be added shortly